-
简介
Listmonk 是一个开源、自托管的时事通讯和邮件列表管理器
-
搭建
首先搭建一下postgresql,我习惯在nas上搭建各种数据库,所以postgresql是直接使用docker compose 启动的
version: "3"
services:
  postgresql:
    image: "postgres:14-alpine"
    container_name: "postgresql"
    restart: "always"
    environment:
      - "POSTGRES_PASSWORD=password"
      - "POSTGRES_HOST_AUTH_METHOD=trust"
    shm_size: 256mb
    ports:
      - "5432:5432"
    volumes:
      - "/etc/localtime:/etc/localtime"
      - "./data:/var/lib/postgresql/data"
搭建完成之后创建一个名字叫listmonk的数据库
之后初始化这个数据库
首先创建listmonk的配置文件
vim config.toml
[app]
# Interface and port where the app will run its webserver.
address = "0.0.0.0:9000"
admin_username = "xxx"
admin_password = "xxxxxxx"

# Database.
[db]
host = "host"
port = 5432
user = "listmonk"
password = "pass"
database = "listmonk"
ssl_mode = "disable"
max_open = 25
max_idle = 25
max_lifetime = "300s"
导入表结构
docker run -v /root/config.toml:/listmonk/config.toml listmonk/listmonk:v2.3.0 ./listmonk --install --yes
接着就是在k8s里面创建listmonk这个应用
创建deployment
vim deploy.yaml
apiVersion: apps/v1
kind: Deployment
metadata:
  name: listmonk
  namespace: app
spec:
  selector:
    matchLabels:
      app: listmonk
  template:
    metadata:
      labels:
        app: listmonk
    spec:
      imagePullSecrets:
      - name: regcred
      containers:
      - name: listmonk
        image: listmonk/listmonk:v2.3.0
        ports:
        - containerPort: 9000
        env:
          - name: TZ
            value: "Asia/Shanghai"
        volumeMounts:
          - mountPath: /listmonk/config.toml
            name: listmonk-config
            subPath: config.toml
        resources:
          limits:
            memory: "128Mi"
            cpu: "500m"
      volumes:
        - name: listmonk-config
          configMap:
            name: listmonk-config
            items:
              - key: config.toml
                path: config.toml
创建kustomization的配置
vim kustomization.yaml
resources:
- deploy.yaml
- svc.yaml
- ingress.yaml
- certificare.yaml
- configmap.yaml
应用的configmap
vim configmap.yaml
apiVersion: v1
kind: ConfigMap
metadata:
  name: listmonk-config
  namespace: app
data:
  config.toml: |-
    [app]
    # Interface and port where the app will run its webserver.
    address = "0.0.0.0:9000"
    admin_username = "xxx"
    admin_password = "xxxxxxx"

    # Database.
    [db]
    host = "ip"
    port = 5432
    user = "listmonk"
    password = "pass"
    database = "listmonk"
    ssl_mode = "disable"
    max_open = 25
    max_idle = 25
    max_lifetime = "300s"
应用的service
vim svc.yaml
apiVersion: v1
kind: Service
metadata:
  name: listmonk
  namespace: app
spec:
  type: ClusterIP
  selector:
    app: listmonk
  ports:
  - port: 80
    targetPort: 9000
    name: http
应用的ingress
vim ingress.yaml
apiVersion: networking.k8s.io/v1
kind: Ingress
metadata:
  name: listmonk-ingress
  namespace: app
  annotations:
    kubernetes.io/ingress.class: "nginx"
    nginx.ingress.kubernetes.io/ssl-passthrough: "true"
    nginx.ingress.kubernetes.io/force-ssl-redirect: "true"
spec:
  rules:
  - host: "listmonk.xxx.com"
    http:
      paths:
      - pathType: Prefix
        path: "/"
        backend:
          service:
            name: listmonk
            port:
              number: 80
  tls:
  - hosts:
    - listmonk.xxx.com
    secretName: listmonk-xxx-com-tls
argocd相关的东西
vim argocd.yaml
apiVersion: argoproj.io/v1alpha1
kind: Application
metadata:
  name: listmonk
spec:
  destination:
    name: ''
    namespace: ''
    server: 'https://kubernetes.default.svc'
  source:
    path: k8s/listmonk
    repoURL: 'https://git.xxxx.com/xxxx/kubernetes-yaml'
    targetRevision: HEAD
  project: default
  syncPolicy:
    automated: null
使用certmanager直接去申请证书
vim certificare.yaml
apiVersion: cert-manager.io/v1
kind: Certificate
metadata:
  name: listmonk.xxx.com
  namespace: app
spec:
  dnsNames:
  - listmonk.xxx.com # 要签发证书的域名
  issuerRef:
    kind: ClusterIssuer
    name: letsencrypt-dns01 # 引用 ClusterIssuer,指示采用 dns01 方式进行校验
  secretName: listmonk-xxx-com-tls # 最终签发出来的证书会保存在这个 Secret 里面
最后直接在argocd里面把应用创建好就好了
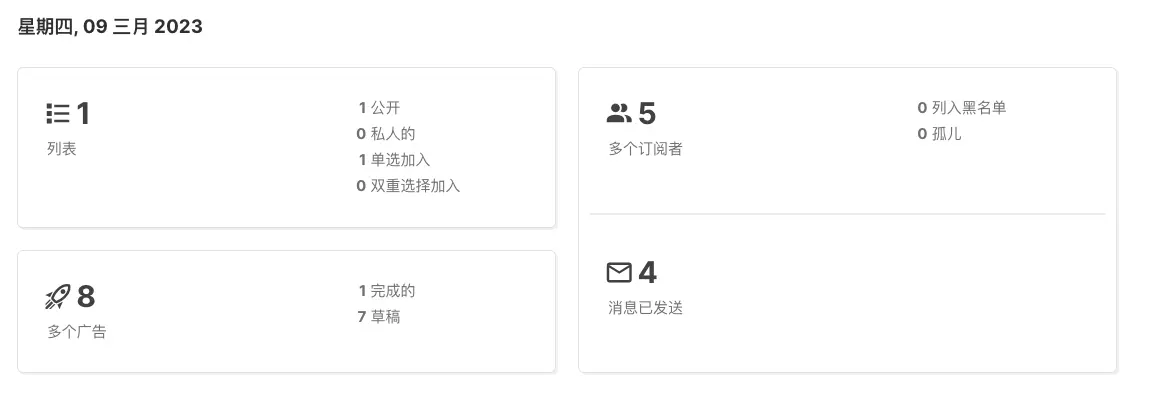
使用
登录之后的第一件事情就是配置邮箱
首先配置默认“发件人”电子邮件,之后配置smtp服务器,如果你和我一样是163邮箱的身份验证协议使用的是plain
最后
我的订阅地址是
https://listmonk.bboysoul.cn/subscription/form
欢迎订阅
虽然目前我也不知道可以给大家发什么样的信息
欢迎关注我的博客www.bboy.app
Have Fun